Hello everyone,
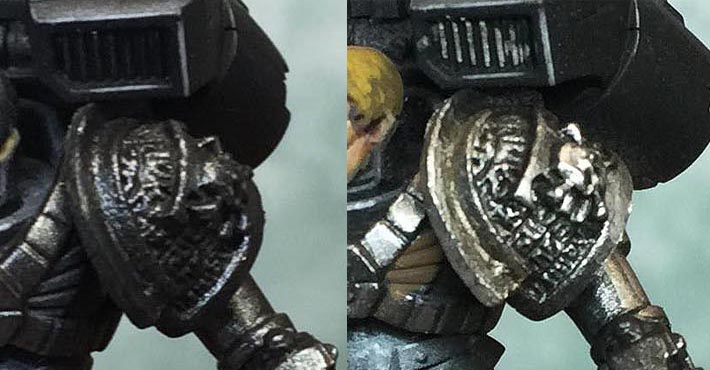
Here’s a short tutorial created by Myles David from Lil Legend Studio, showing you how to paint beautiful silver metallic tones on your miniatures. The example here is demonstrated on the shoulder pad of a Deathwatch Space Marine, but the technique can easily be applied to any other model that requires a realistic, high-contrast metallic finish.
This guide will take you step by step, from paint selection to final touches, to help you achieve a deep, bright, and richly nuanced silver metal on your figures.
To begin, apply an even coat of Vallejo Black Metal. This paint provides an ideal foundation for silver tones: its dark, slightly glossy finish immediately adds depth while giving excellent coverage for the highlights to come. Make sure to achieve a smooth, opaque layer to ensure a clean and consistent final result.


Next, apply Vallejo Gunmetal to the areas of the armor that are directly exposed to the light source. This step helps begin structuring the volumes and creates the first light-and-shadow contrast.
Be sure to preserve the shadowed areas with Vallejo Black Metal, especially in recesses, undercuts, and sections facing away from the light. Maintaining these deep shadows is essential to give depth and prevent the finish from looking flat.
Next, add subtle highlights with Vallejo Silver on the most exposed areas, such as the upper edges and parts directly hit by the light. This brighter shade helps accentuate the relief and enhance the metallic effect.
To give your piece a bit of character and wear, create fine scratches, micro-chips, and small impacts using a very fine brush. Just a few precise dots and lines are enough to suggest realistic wear, such as scratches from projectiles, rubbing, or repeated impacts on the armor.


To finish the piece, carefully apply Games Workshop’s Agrax Earthshade into the recesses of the armor. This wash helps deepen shadows, add depth, and subtly blend the different metallic tones together.
Be precise with your application, it’s better to concentrate the wash in the recesses rather than spreading it evenly, to avoid dulling the highlighted areas. A controlled application will result in a clean finish and a metal with rich contrast.
We hope this simple and quick method for painting silver metals will be useful and help you achieve more convincing results on your miniatures. Feel free to adapt these steps to your own style, experiment with different paint ranges, try varying intensities of highlights or washes, and most importantly, have fun bringing your models to life.
Don’t missed to support us on PATREON!
Questions, ideas, spelling error or just want to share your thoughts? Leave a comment below! And if you enjoy our work, a little support would help us keep creating more and more content.
See you soon!