Hello everyone,
In the following article, Sigur from BattleBrushStudio will show you a way to paint a Plague Marine in the colors of the Apostles of Contagion. After cleaning, assembling, and adding a bit of texture to the base, I apply a dark green primer. The photos can be enlarged, so feel free to click on them to see the details of the painting process.
In my case I used Vallejo’s Russian Green 4BO primer, but pretty much any other dark primer will do. Even black or dark brown. With dark brown the overall tone of the figure will end up being a bit warmer of course.


For the next step a coat of Vallejo Model Air (VMA) Light Brown is applied via airbrush. If you don’t own an airbrush you can do this step by painting the paint onto the most exposed surfaces and the ones which would reflect the most light. If it’s a little rough looking don’t worry. If you don’t have this exact colour, don’t worry. Any light, sandy brown will do. Note how I barely touched the feet and legs in the front, because these very much are in the shadows, and painting 28mm figures is all about contrast, isn’t it.
This step is followed by a drybrush with white paint. Broad, soft brush, put on paint, wipe it ALL off, brush against edges. There are tons of guides online on how to do this. We will be offering assembly and painting tutorials designed specifically for beginners as soon as possible. The goal is to publish them all at once, in the form of a coherent set. Since this represents around ten articles to produce, we’ll do our best to bring them to you as soon as we can.


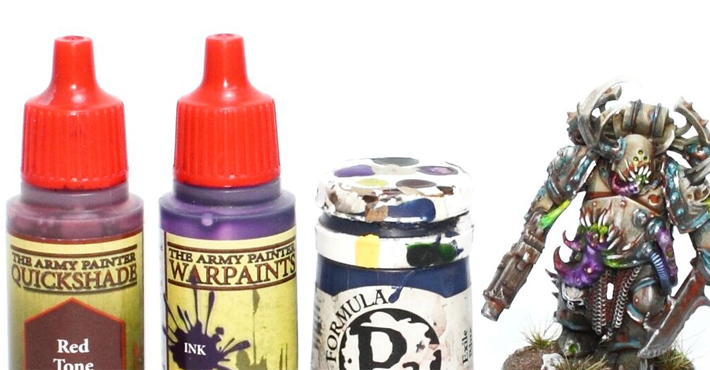
Next I apply a coat of mid-brown wash. I use Army Painter’s washes (same stuff as GW’s older washes, so it’s good). Feel free to apply some more into deeper-shaded areas once the first coat is dry. While that’s drying I use the time to put a base coat of silvery metallic onto the sword’s blade and the boltgun’s metal parts.
Once that’s completely dry (nothing worse than have metallics run into wet washes) I start basic detailwork by painting the metallic fittings on the armour with Vallejo Game Color Tinny Tin. If you’ve got GW’s old Tin Bitz lying around use that, if you use Army Painter’s True Copper or something other vaguely similar paint use that. It’s not what colours we use, it’s how we use them. Especially so on Nurgly figures…


…and another round of washes! In this step I use the dark wash to deepen some shadows, give the whole affair a bit more definition. I also use a black wash to give the silver-y metallics on the gun and the sword a bit of a shade.
This is the step where the fun really starts. Apply a layer of dark brown wash – AP’s Strong Tone in my case – over the metallics we just did. Be careful that the metallics are completely dry, otherwise we get that bad wash-metallics situation again. While we got the dark brown wash at hand, get out your rusty red colour of choice out. I like using Rackham’s (yes, that range has useful paints too!), because it dries very matte and a bit grainy. I also enjoy the tone of the colour. Mix dark brown wash with your rust colour and apply where seen fit. I use it to paint it into deeper gaps, add rusty spots here and there and so on. Of ocurse you can also use the rust product of your choice, but I prefer suggesting materials most people have lying around rather than make them hunt for some specific product they may not need at all. I do the same on the sword’s blade and the boltgun’s metallic parts.
Apply the rust in two steps: First a darker step with lots of wash added, followed by a brighter rust tone within the bigger rusty spots and deeper rusty gaps. Technically you can build up as much as you like, even adding orange or a bit of yellow to the mix for the final spots.


Now for the tinny metallics: mix turquoise paint with green wash (or brown. Or black.), and do the same thing we just did on the armour and on the silvery metallics.
Now add some white to the whole mix and paint that into the deeper gaps and larger spots of weathering on the metal fittings. How crazy you go in terms of contrast is up to you. Just always keep in mind that the figure will stand on a usually dark gaming table, at arm’s length distance (at least), and gaming tables usually aren’t as well lit as a painting desk. While we have white paint at hand do some stark highlights on fleshy parts such as tentacles, skin, bits where the armour broke open, and so on…

")
…because now we break out the nice colours! At this step you can go with any colours you like really. If you prefer greener skin go with greens, if you prefer darker skin, go with that, and so on. Papa Nurgle’s got a place in his heart for any colour of boils. I apply purple wash over the tentacles with a bit of red in the tips. On tubes I use dark blue (p3 Exile Blue, because it’s a bit toned down) in a very thin, watered-down layer. Goes well with the rest of the colours used so far.
Now for the typical ‘rough woodgrain’ look on the bolter casing. Very simple: Dark Brown – I use Vallejo Model Color Chocolate Brown – basecoat, mix it with some white to get a cream-y, off-white colour, paint on wood grain (can be rough, does not matter). Using this colour you can also basecoat teeth and claws, paint skulls on the armour, and so on.


Apply dark brown wash over the wood grain parts (also over skulls and other details if you deem it necessary), highlight back up on the edges where necessary. Paint white highlights onto skulls, claws and teeth.
Looking good already. For the next step I add some highlights to the metallics using some bright, silver-y metallic paint such as Runefang Steel. I apply it to the silvery and tinny metallics alike, just a few dabs here and ther on the most exposed edges; a bit more on the gunmetal parts and the sword’s blade.


Now let’s take care of the last few details. First some eyes, because that’s relaxing and easy. The eyeballs have been painted black already, so I just paint them red now and give them a little pale yellow dot. Easy peasy, eyes done.
Now for the blisters on some of the fleshy parts. Again, there are thousands of possible approaches and colours you could go for. I give them a light wash of red and again pale yellow dots on top. If you feel like it you can research zits and boils on the internet (general tip: research what things look like in real life rather than how people painted things); probably not right after you’ve had a hearty meal.


Let’s add one more little bit on top to finish the mini off – glowing green slime! This one’s really easy – it’s just a mix of gloss varnish, green and yellow. This step is strictly fun and free-form. Apply where you see fit, apply as much as you see fit, have the viscosity and density as you see fit.In general I seek out bits where stuff may ooze out of and where it fits in terms of colour balance.
This finishes our Plague Marine! Just a bit of basing done and there he is!

Don’t missed to support us on PATREON!
At the bottom of each post, you’ll find a list of all related blog entries, which we’ll update as the project evolves.
- Death Guard Project – Apostles of Contagion.
- Death Guard Project : List of Arch-Contaminators
- How to paint an Apostles of Contagion
- Death Guard Project : First Combat Patrol
- Death Guard Project : Mechanical Reinforcements
- Tuto : How to Paint a Poxwalker
- Death Guard Project: Mamon The Arch-Corruptor of Vraks
- Death Guard Project : A Second Daemon Prince of Nurgle
- Death Guard Project : Helbrute
- Death Guard Project : Winged Daemon Prince
- Death Guard Project : Foetid Bloat-drone
- Death Guard Project : Necrosius the Undying
- Death Guard Project : Chaos Lord In Terminator Armour
- Death Guard Project : Trio of Malignant Plaguecaster
- Death Guard Project : Foetid Bloat-Drone with fleshmower
- Death Guard Project : Noxious Blightbringer
- Death Guard Project : Nurgle Blight Drone Trio
- Death Guard Project : Blightlord Terminators 2
- Death Guard Project : Foul Blightspawn
- Comming soon…
Questions, ideas, spelling error or just want to share your thoughts? Leave a comment below! And if you enjoy our work, a little support would help us keep creating more and more content.
See you soon!